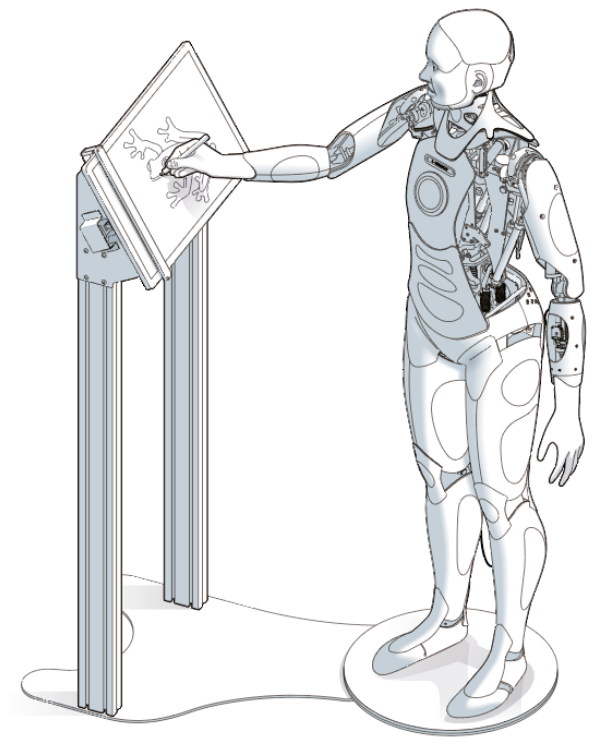
It is possible to use a specially modified version of Ameca to create drawings. The required modifications include:
- a non-standard drawing arm and hand
- a custom designed whiteboard drawing stand
- additional electronics within the robot for integrating with drawing board
- custom firmware and software to enable the drawing behaviour
¶ Arm and Hand Modifications
- Ameca draws with the right hand, using a specialised version of the forearm and hand
- the hand does not have any actuated movements in the fingers, which are replaced with a manually-poseable armature design, with customised features for gripping a whiteboard marker pen
- Ameca cannot pick up and put down the pen; the pen is manually attached to the hand by inserting into the receiving brackets built into the hand structure
- Ameca cannot remove and replace the lid of the pen - this must be done manually
- it is recommended to keep the lid on the pen at all times when Ameca is not active and/or required to create drawings
¶ Drawing Library
- Ameca draws images selected from a pre-programmed library of images
- this library can be customised to customer requirements at time of purchase
- the images are specially designed to be suitable for Ameca's drawing capabilities and technique
- on receiving a drawing request, Ameca will use the same 3rd party large language model that it uses for conversational interaction to select the appropriate image from its library
- if Ameca does not have an image matching a specific request, it may offer an alternative that it considers related to the original request, based on the logic provided by the large language model
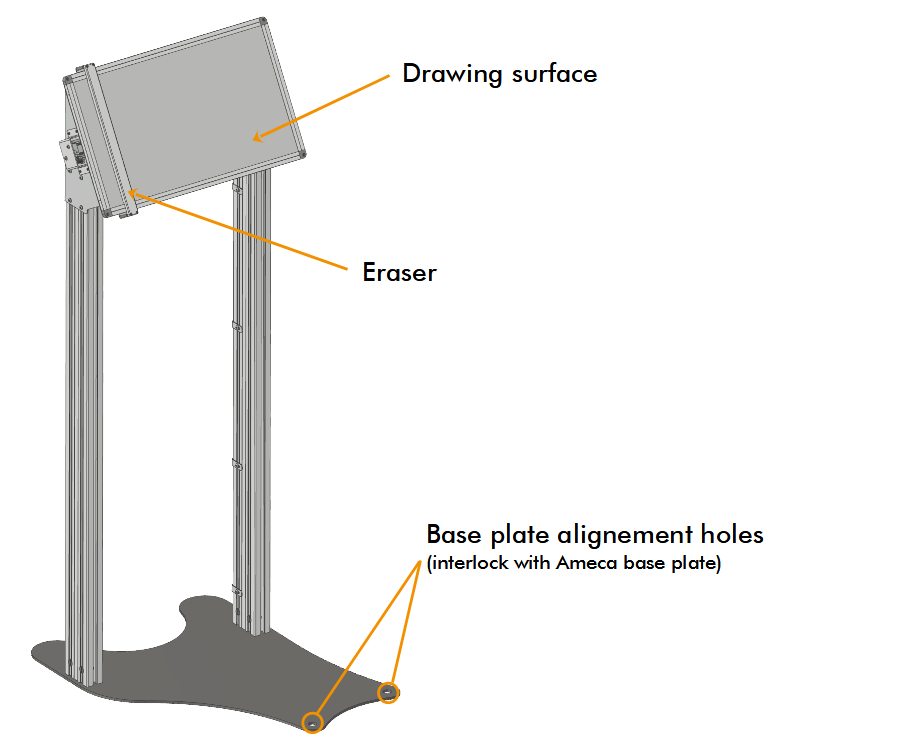
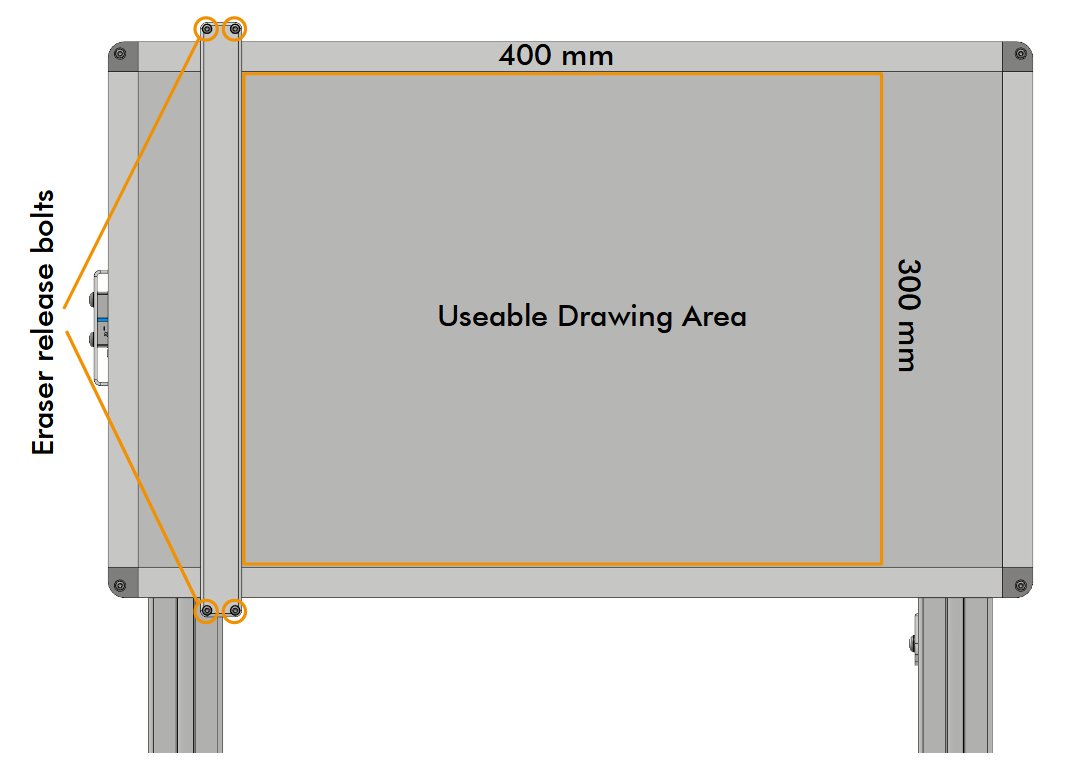
¶ Drawing Board
- the drawing board locates in a fixed position relative to Ameca via interlock between the drawing board base and Ameca's base plate
- the board has a usable drawing area of 400 mm x 300 mm as illustrated
¶ Eraser Functionality
- the drawing board has a built-in self-erase function
- the eraser is actuated pneumatically, requiring a pneumatic supply (min 2 bar)
- a pneumatic regulator is built in to the drawing board - it should be set at 2 - 2.5 bar
- to control the eraser, the board is electrically connected to Ameca via a single plug
- the eraser uses a felt strip, which should be replaced periodically as marker ink accumulates
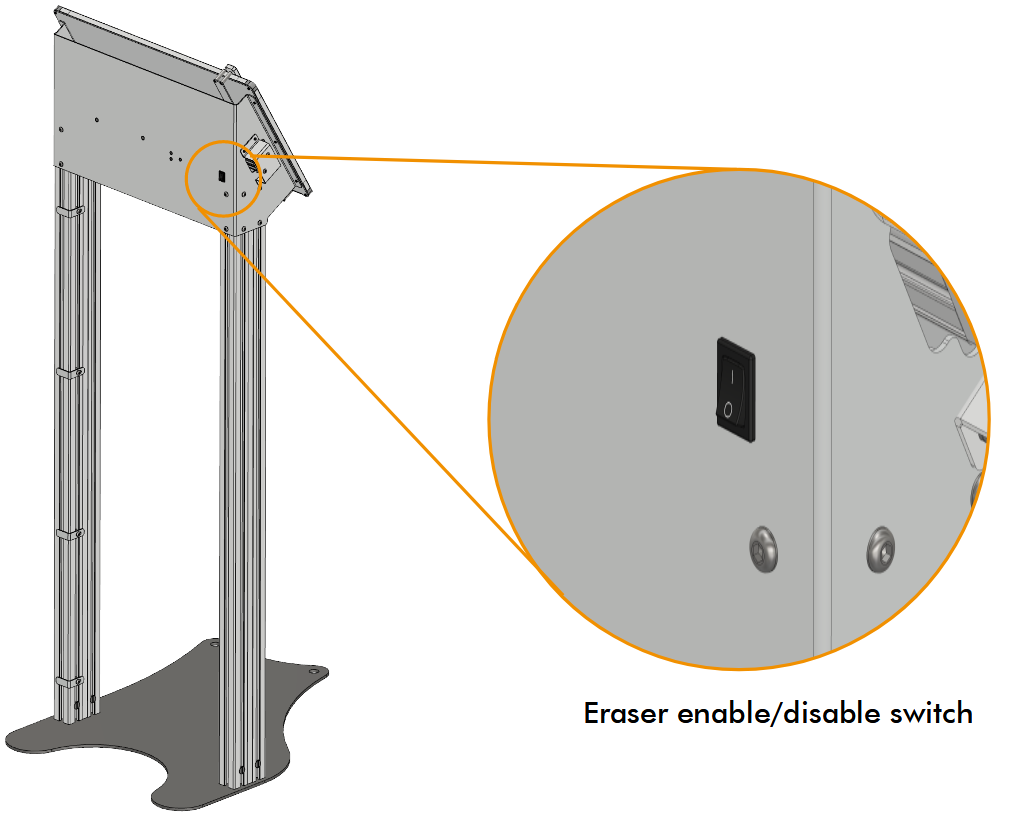
- a switch is included on the whiteboard to give the option of diabling the eraser (see image)
- 0 = erase disabled
- 1 = eraser enabled
- the eraser is actuated pneumatically, requiring a pneumatic supply (min 2 bar)
¶ Eraser Felt Replacement
- undo the four screws connecting the eraser to the board (torx TX10 - see image) and remove the eraser
- peel off the old felt strip (attached by adhesive tape)
- remove the protective paper backing from a replacement felt strip and apply to the eraser body
- strips are 20 mm wide, 295 mm long and 5 mm thick
- ensure that the stip is located centrally along the eraser body (equidistant between the ends)
- apply the replacement strip with firm pressure to ensure a good adhesive bond
- re-fit the eraser to the board using the four TX10 screws
- NOTE: the eraser attachement plate will bow slightly as you tighten the screws to secure the eraser to the board. This is the designed function, with the spring force from the bowed plate providing pressure to hold the eraser firmly on the whiteboard.
- the board should be manually cleaned with whiteboard cleaner periodically to maintain its condition
¶ Eraser Control
-
the eraser on the whiteboard is controlled directly by the connected Ameca robot
-
depending on the position of the rocker switch on the back of the board, Ameca may clean the whiteboard before her next drawing.
-
the whiteboard eraser can be controlled manually (without Ameca's help) by accesing it through the devices page.
- The wiper is controlled with:
Whiteboard Controller/Wiper/Demands/Duty Cycle - The wiper can be controlled by setting the
Duty Cycle. A value of100will push the wiper to the right, and-100to the left, returning it home.
- The wiper is controlled with:
Care must be taken when cleaning the board whilst manually controlling the wiper so that the user's and Ameca's fingers are not caught.
¶ Use of Paper
- if you want to keep drawings created by Ameca on a piece of paper, a single sheet of paper can be layed over the whiteboard and secured in place with magnets
- when working in this mode, be sure to disable the eraser function with the rocker switch on the rear of the drawing board
- paper should be A3 sized and positioned with the long edge resting on the bottom border of the board. This means the whole of Ameca's drawing and signature will be on the page, which is not possible for some smaller paper sizes.
¶ Calibration
Following physical install, Ameca must be calibrated to the drawing board.
- this process informs the robot of the exact position in space of the drawing surfce, relative to itself
The calibration process is as follows:
¶ Record corner poses:
The position of the corners of the board are recorded by running a script whilst placing the pen in each corner, as follows:
Ensure Ameca's motor power is disabled for this process (red button on the right hip of the robot).
- Connect with the robot on a PC via the Tritium UI.
- Within the Tritium UI, navigate to
scripts/Drawing/Record_pose.py
- Within this script, set the
ARM_POSITIONvariable to:top left. - Manually move Ameca's drawing arm, and position it to place the tip of the pen so it touches the top left corner of the drawing board's drawing area (the exact position is not critical).
- When in position press the "play" arrow to run the
Record_pose.pyscript in the Tritium UI. - Check for error messages in the terminal. It will tell you if the Shoulder Roll Right degree of freedom was in an invalid position. If so, adjust the shoulder position and try again.
- Repeat steps 1-4 three more times, once for each of the other three corners of the drawing board.
- For each run, you must set the
ARM_POSITIONvariable to have the correct name for each corner, as follows: "top right": touch the top right corner of the board with the pen"bottom left": touch the bottom left corner of the board with the pen"bottom right": touch the bottom right corner of the board with the pen
- For each run, you must set the
- Within the Tritium UI, navigate to
¶ Recorded up and down positions
It is important that the recorded_up and recorded_down poses are in suitable positions to avoid collisions with the board. These come preset, but can also be recorded with the Record_Pose.py script. The recorded_down pose should have the arm down with the wrist infront of the thighs. The recorded_up pose should have the arm raised and extended away from the board, infront of the body. Care should be taken when trying new recorded_up and recorded_down poses, ready to turn off motor power if the is about to be a collision.
¶ Resampling
The Resample.py script allows iterative improvement of the robot's drawing ability by teaching it where the board is. Turn off HB3_Controller.py and Chat_Controller.py before running it. For the first attempt, USE_ADJUSTMENT variable must be FALSE. Running the Resample.py script makes Ameca draw her best guess at an evenly space grid of points on the drawing surface. It is expected that the grid would look warped at this point, this will be corrected by the next step.
Once this grid is drawn take a photo of the board with minimal marks (not made by the drawing robot) on the board, with full view of the whiteboard, and avoiding glare from overhead lights etc. Send this photo of the board to a member of Engineered Arts to process this image and supply you with snippet of code containing a tensor of correction values.
Also restart Tritium or the robot before the next step. This will back up the results of the first pass, so they can be recovered if the second pass will have any issues rather than needing to repeat the first pass again.
Following their instruction and pasting the line of code into the Resample.py script and set theUSE_ADJUSTMENT variable as True. Re-running the Resample.py script will draw a much improved grid, teaching Ameca the correct positioning of the board.
The robot should be re-calibrated using this process whenever it (or the drawing board) is moved.
¶ Enabling and Disabling the Drawing Mode
- can be done in script, by voice etc
¶ How to Request a Drawing
- when Ameca has the drawing mode enabled, you can request drawings as part of a natural conversation
- the is no special keyword or phrase required. For example:
- "Ameca, can you draw a cat for me?"
- "Draw a lion"
- the is no special keyword or phrase required. For example:
- during drawing, Ameca will endeavour to keep viewers intersted by making relevant observations and conversation on the theme of the drawing subject