A hardware device for testing network and internet connectivity prior to a robot installation, performs a series of tests that confirm the network will function as expected when a robot is installed.
Checking your network in advance will save valuable time during robot installation and is highly recommended.
The check tool is offered to customers on free loan ahead of robot delivery, and should be returned to the installation engineer after commissioning.
An out of the box router’s configuration should be sufficient for correct operation on most networks, however problems that need additional configuration, can result from some network security schemes.
See Robot Network Configuration for details of the connections that the robot needs to be able to establish for correct operation.
¶ Usage
The power supply is fitted with a UK plug but with a suitable adapter should be suitable for use worldwide (100-240VAC 50/60Hz).
Note that other USB-C power sources may not provide sufficient power for the unit to operate correctly.
Please use the provided power supply.
Connect the Ethernet to your network, preferably to the actual socket that will be used by the installed robot.

The display will initially appear white. After approximately 20 seconds the screen will be initialised and by 40 seconds after power on the user interface should be presented as follows:
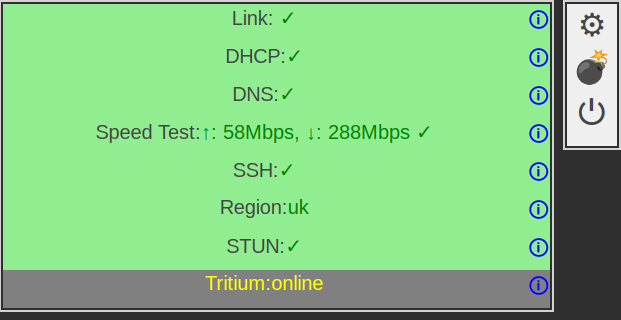
The link, DHCP and DNS items will quickly update to show either a green tick mark indicating success or a red cross indicating failure.
The speed test will then be run (this can take some time), after which the remaining statuses will update.
Note that entries may initially fail and show with a red cross (✗) and later update with a green check (✓) depending on the responsiveness of the network and infrastructure to which the unit is connected.
The user can tap on a status label to reveal some related details, such as link speed, IP addresses etc.
A fully functional network is indicated by all status showing in green as follows:
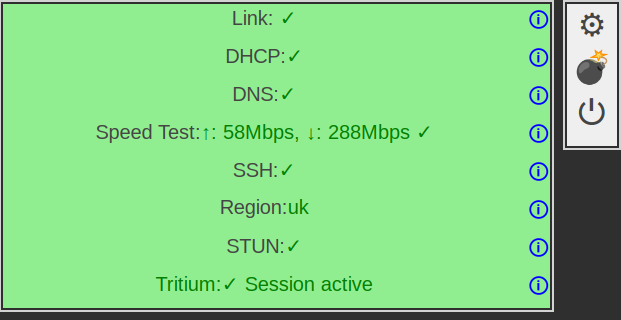
To achieve the Green check and “Session active” text requires manual intervention by visiting https://tritiumrobot.cloud/auth/login and connecting to the relevant entry, e.g. “nc-0002”. The correct system can be found by tapping the DHCP status area and looking for the hostname in the information provided:

¶ Shutdown
The unit can be shutdown or restarted by tapping the power symbol (⏻) on the right hand side.
The following is presented:

Tap “⏻ Shutdown” to shutdown.
Tap “⟳ Restart” to restart.
Tap “🗙 Cancel” to cancel.
Note that when shutting down the screen will not switch off, but remain white. The green LED which can be seen within the unit near the power connected (and next to a red one) will blink 10 times to indicate that the unit has finished shutting down. This happens within a few seconds of tapping the shutdown button.
¶ MAC Spoofing
A MAC address, (Media Access Control) is a unique identification code programmed into every network connected device.
MAC filtering may often be configured to only allow known devices to connect to the network, this will block a robots connection unless the correct MAC has been added to the network configuration.
To test the network as if the actual robot is connected, the robots MAC address can be entered overriding the default MAC address of the unit.
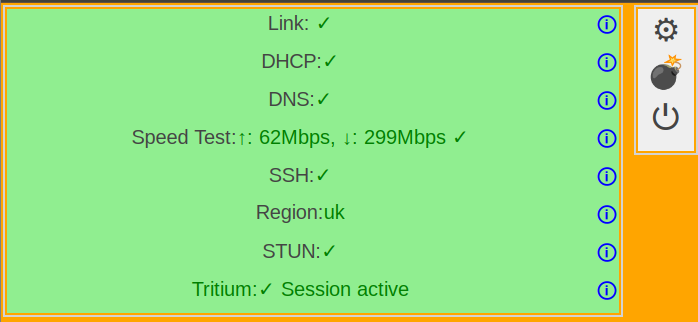
Note: When shipped to a customer the robots MAC address should already be set and active. An orange background is used to indicate that MAC Spoofing is active:
TIP: If you suspect MAC address filtering is active you can set the units MAC address to that of a device that is known to work (e.g. a laptop) to test if connectivity is then established.
WARNING: never connect two devices to the same network with the same MAC address at the same time. Doing so will cause connection problems for both of them.
¶ Spoofing a MAC Address
Tap the settings button (⚙ top right). The below will be presented:
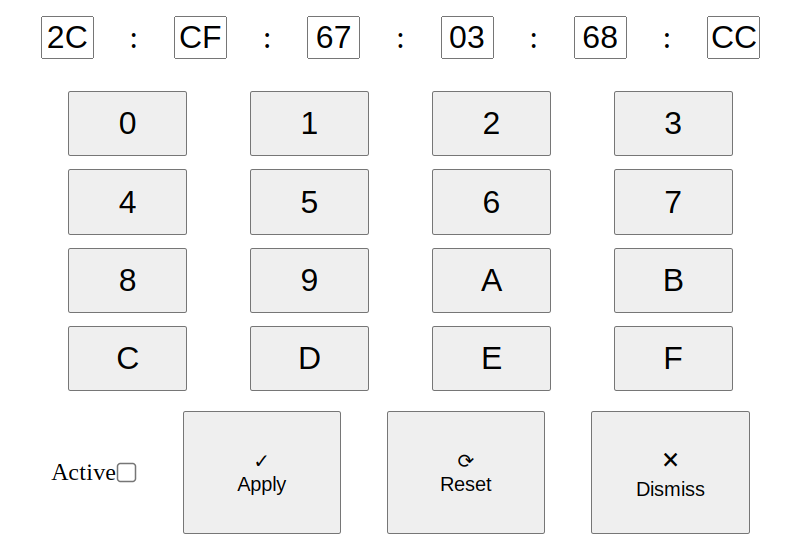
Before making any changes to the MAC address make a note of the existing one so that it can be re-entered later.
The MAC address can be amended by tapping the desired field and pressing the appropriate digit keys 0-F. When a field has been filled input will automatically flow to the next one until the entire address has been entered. Pressing the “Apply” button will validate the entered MAC Address (hexadecimal validation only). Assuming ok a green background will be displayed for the input fields and the entered MAC address will be saved. Any bad fields will have a red background.
When a valid MAC address is entered the “Active” checkbox can be checked. Pressing the apply button will then enable MAC Spoofing.
Pressing the “Reset” button will revert the entered MAC address to the units default, overriding any entered for a robot. To apply and save the default MAC address press the apply button. To cancel the action press the “Dismiss” button.
The “Dismiss” button closes the settings page.
¶ System update
From time to time there maybe updates available for the network check software. If asked to do so tap the 💣icon at the top right of the screen.
Then tap the “💣Update” button to continue or the “🗙 Cancel” button to cancel.
At the time of writing there is no feedback provided by the update process.
The unit will automatically restart when the update has finished.