Animator provides a way of key-framing movements over time to create a sequence that you can then play on a robot.
This application can be accessed from the Tritium UI.
- Quick-start guide - A step by step instructions manual to start your first animation.
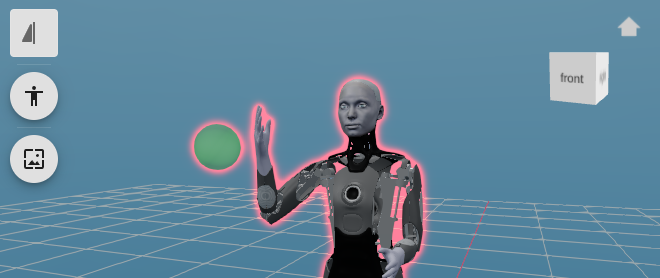
¶ 3D view window
The 3D view window is located in the center of the screen, where you can watch your sequence play back on an interactive SDF model of the robot.
You can navigate the 3D world using mouse controls or the orbit controls. Left mouse click (or clicking on the cube sides and arrow) will change the orbit. Middle mouse is for zoom.
You can also manually control your robot by clicking on the part you wish to select, and then dragging it to the desired position.
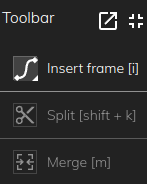
¶ Toolbar
The toolbar is on the left of the 3D view Window.
 Mirror appllies changes to matching gadget Control values on the Left and Right side.
 Toggle gaze target visibility.
 Reset pose to the one at frame 0, if there is no Key-frame value for a Control at frame 0 then the default value for the Control is used.
 Save the current 3D view as a still image.
¶ Orbit controls
Orbit controls are found on the right of the 3D view window. Clicking on a face of the cube will orientate the camera to face that position. The home icon above it will return the camera to the initial position. The arrows that appear around the cube are shortcuts to the left, right, bottom, and top views.

¶ Asset manager
The asset manager is located on the left side of the sceen, displaying the projects assets, scenes and timelines in a tree. The asset manager panel lets you view and create/ edit/ delete playable Assets.
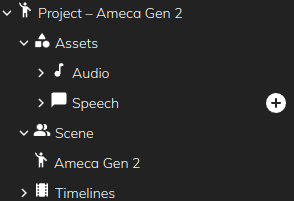
The audio branch contains the project's audio files. You can add audio files by dragging them into the asset manager or directly into the timeline.
¶ Speech
The speech branch contains TTS (Text-to-speech) assets. You can generate a new TTS asset by clicking the '+' icon on the right-hand side. By default, Animator only supports the creation of TTS files with Amazon Polly in over 30 different languages.
Polly audio can be further customised using SSML tags e.g. adding pauses, emphasis, and accents. Make sure you escape any reserved characters used in your text.
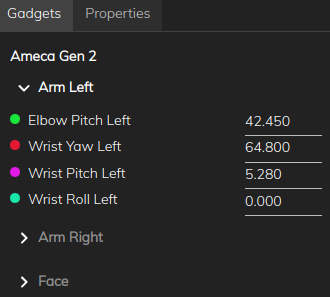
¶ Gadget inspector
The gadget inspector panel is on the right of the animator page, with two tabs:
¶ Gadgets
The gadgets tab of the gadget inspector allows precise positioning of the robot's limbs by entering degree of freedom values.
¶ Properties
The Properties tab is where you can enable limit controls and edit clip properties.
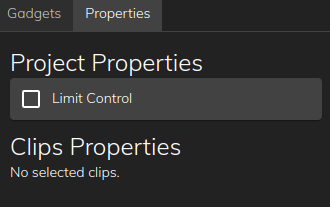
Limit Control restricts which body parts this clip controls during playback, so other robot movement can continue on unselected parts. For how this interacts with playback and motor sharing, see Sequence Player and arbitration (developer docs).
¶ Toolbar and Timeline
The toolbar and timeline is located at the bottom of the animator page.
¶ Toolbar
The toolbar contains shortcuts for clip editing operations. More of these tools can be accessed from the 'Edit' menu in the topbar.
; Is a shortcut to un-dock the toolbar from the bottom of the page and drag it anywhere on the screen.
;
Toggles expanded and collapsed toolbar views.
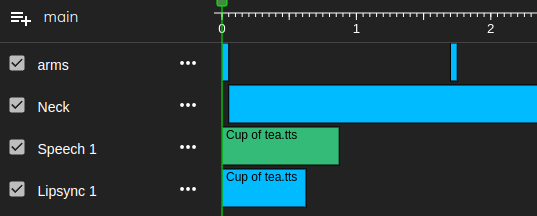
¶ Timeline
The timeline panel lets you create and play back your sequence. It displays clips and audio files in chronological order. New items can be added clicking the 'insert frame' button in the toolbar. New tracks can be added by clicking the button next to main. The current frame can be accessed using the timeline navigation buttons.
¶ Timeline view selection
The timeline view selection panel is located above the timeline and lets you toggle between item, frame, and curve modes to help fine-tune your animation.
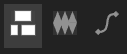
Example of a track in item, frames, and curves view in ascending order.
¶ Timeline navigation
The timeline navigation buttons are found above the timeline. They can return to the start of the timeline, skip, play, toggle loop animation and move to precise times.

¶ Timeline HotKeys
i - Adds keyframes of the selected controls in the selected track
ctrl+z - Undo
ctrl+y - Redo
ctrl+a - selects all the keys or controllers in a timeline
ctrl (hold) - scaling selected keys along time axis or value axis
¶ Where to start
- Glossary - a page of key terms used in, or relating to, Animator.
- Quick-start guide - information to help you get started creating animations for your robot.
- Animation basics - A guide to key concepts in creating animations for robots.
¶ Other useful pages
- See the EArts Shared Content Repo page for examples of sequences that you can play on your robots.
¶ Troubleshooting
¶ My Animation Doesn't Play on the Robot
Here is a list of common solutions in case the animation isn't playing:
- Make sure the robot is on and connected to the network
- Make sure the animation file is copied on the correct robot
- Make sure Tritium is connected to the correct robot
- Make sure the animation file contains an animation
- Check the Properties tab next to the Controls tab: If "Limit Controls" is ticked, make sure the animated controllers are also ticked.